 Heather says:
So here’s the recipe that almost wasn’t. Today I pulled the peppermint bark out from the refrigerator where I’d tucked it in utter dismay last night and realized that I may have been a little cranky and my judgement was more than a little harsh. Just because the peppermint bark didn’t turn out as I had envisioned it, doesn’t mean that it was a failure, it just means I need to take a deep breath and relax. Sheesh.
I should also probably note the only reason it didn’t turn out as I envisioned is I rushed a step. This recipe is far easier than you’re thinking.
You don’t even need a thermometer.
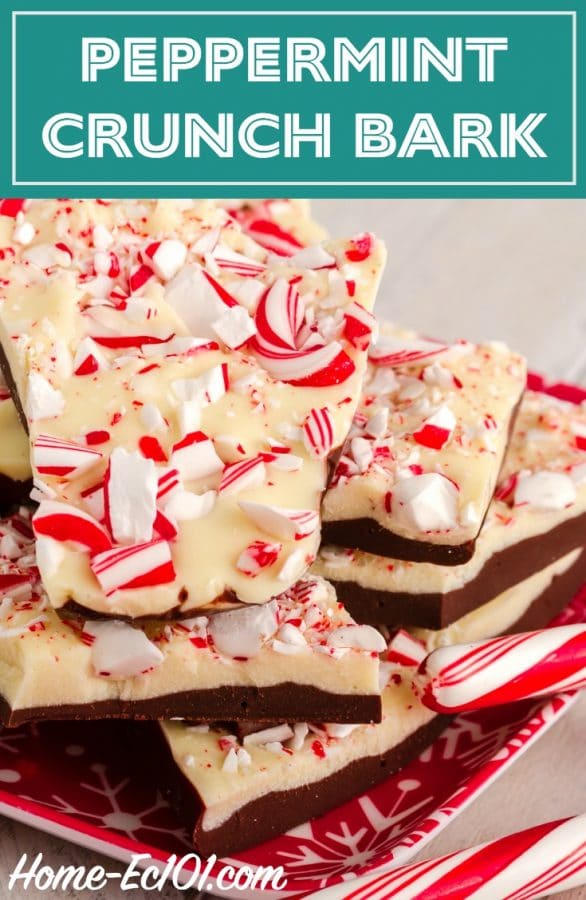
How To Make Peppermint Bark
Ingredients:
- 12 oz white chocolate , finely chopped
- 6 oz (12 candy canes) or 30* red-and-white-striped hard peppermint candies, coarsely crushed
- 7 oz Semisweet chocolate, chopped
- 6 TBSP whipping cream
- 1/2 – 3/4 tsp peppermint extract – OPTIONAL, I think this might even be better with a less minty counterpoint.
*I’m sure I could gather that many in just two trips to Sonic’s Drive-In
Necessary tools:
- aluminum foil
- cutting board or a square of heavy cardboard
- spatula, rubber or silicone
- 1 bowl either metal or pyrex -they must withstand heat
- 2 saucepans, preferably heavy
Nice but totally optional:
Directions:
Wrap the cutting board or cardboard square with aluminum foil. On this foil use the blunt edge of a knife or a clean fingernail to draw a rectangle 8 x 10 or. It doesn’t have to be perfect, this is just a guide.
Heat a pot of water to boiling, then back the heat down to low.
While the water is heating is a good time to coarsely crush the candy and chop the chocolate (in separate batches, there should be no mixing). I used a rolling pin and a freezer bag to contain the mess for the peppermint candy. A cutting board and knife work for the chocolate.
If you have children lurking about, do not leave said bag of crushed peppermint anywhere within reach. Your kitchen will soon sparkle with sticky, sugary mess. (This may be why I was not happy when it didn’t turn out perfectly). After cleaning up said mess, your water should be ready.
Add the coarsely chopped white chocolate to the bowl. Place the heatproof bowl over the water. Check and make sure that the bowl does NOT touch the water, this is vital. If the bowl touches the water, you could scorch the chocolate and that’s just nasty. Stir just until smooth. Carefully remove the bowl from the pot. Wipe the bottom with a towel to prevent dripping condensation onto your work area. Turn off the heat, but leave the pot of water on the stove.
 Pour 1/2 the white chocolate into the rectangle you drew on the foil. To make spreading easier, kind of drizzle it in long lines, then use your spatula to spread it evenly in your outline. It’s ok if you cross the line a little, just don’t go too nuts. Sprinkle your layer with half of the crushed peppermint. Place your foil covered cutting board in the refrigerator for 15 minutes.
While it’s chilling, wash your spatula and begin melting the coarsely chopped semisweet chocolate in a heavy saucepan over low heat. Stir constantly and before it has finished melting, stir in the six tablespoons of whipping cream and 1/2 to 3/4 teaspoon of peppermint extract. Stir until smooth and remove from the heat.
Pull the white chocolate layer from the refrigerator.
 Drizzle all of the melted chocolate in something that resembles lines, if you squint and tilt your head over the white chocolate layer.
 Grab your clean spatula and spread it as evenly as possible. It’s ok if it’s not perfect. Sprinkle it with most of the other half of the crushed peppermints. Put it back in the fridge
Chill it for 15 minutes. This means the WHOLE 15 minutes. Don’t just say oh, it’s been long enough. Well, unless you want it to look like mine. While you’re waiting wash your spatula and the pot you melted the chocolate in, play solitaire or just poke around the Internet. Just don’t head back too soon.
About 3 – 5 minutes before the time is up turn the burner for the water back on low. Put the bowl back over the pot and remelt the white chocolate. Remove the bowl from the pot as soon as it is smooth. If you haven’t already, grab your chocolatey goodness from the refrigerator.
Pour the remaining, melted white chocolate over the previous layers. Spread it as evenly as possible and sprinkle with the last few peppermint crumbs.
Put it back in the refrigerator and chill until set.

If you’re like me and pouting because you couldn’t wait long enough and your top two layers blended, cut it up the next morning. Otherwise 20 minutes should be plenty.

To make it extra pretty, cut off the edges of each side with a sharp knife. This will expose the layers of chocolate and peppermint and it should be quite pretty.
To cut the peppermint bark into triangles for gifts and to make people think you’re way more skilled in the kitchen than reality, cut the bark into strips, then squares, then cut the squares into triangles. These look lovely tucked into tissue paper in tins or in canning jars tied with ribbon. Just make sure they are stored in air tight containers and made no more than two weeks prior to giving.
Enjoy!

Heather,
Thanks for the recipe. Peppermint bark is my DHs favorite Christmas candy and I've never tried to make it for him. Now I can.
In case I didn't say it before — the printing gadget you set up for the site really rocks!
I'm printing this to try – this looks better than the recipe I have used before (which was just white chocolate and peppermint candy)
I'm glad to hear you're finding it useful.
Alright, I'm going to try it. Never made it before either, but that doesn't look that hard at all…
That looks really good, but I'm also in desperate need of chocolate at the moment. I can't eat it unfortunately, due to some ongoing dental work, but I may have to try it. One of my best friends makes cookies and cream bark (oreos in white chocolate) for my hubby and oldest every year.
I am making this right now… I am halving it though as I am needing to finish up some white chocolate that I have and I only have 6 oz.
I am a dork and forgot the whipping cream so we will be making it tomorrow. I struggle sometimes;)
So… I made these yesterday. I think I left mine in the fridge too long and my layers would not stay together when I cut them today.
I overlooked the part about using HALF of the white chocolate at the start so I added some dark, unsweetened chocolate that I had on hand for the third layer. I had to add whipping cream and milk to try to get the consistency right – it's chilling now, wish me luck! ~ G
The peppermint is sticky on the top of the bark! Any advice? Have had it in the fridge for two days and today is Christmas Eve. Wanted to gift it today! HELP!
Was the peppermint sticky immediately or only after being stored in the refrigerator. Was it covered? Humidity can be a huge problem.