 Michele says:
Now that you have your shiny new sewing machine all picked out and ordered, it’s time to learn how to use that crazy looking thing. Unfortunately, learning is the least fun part of using a sewing machine. I’ll do my best to make it painless, but we need to take a second before we start stitchin’ to learn what everything is called. Next time, we’ll learn how to thread the machine, change the footplates, and wind a bobbin. If you can hang on a little longer, then we’ll learn how (and when) to use the various stitches and settings—and finally make our first project.
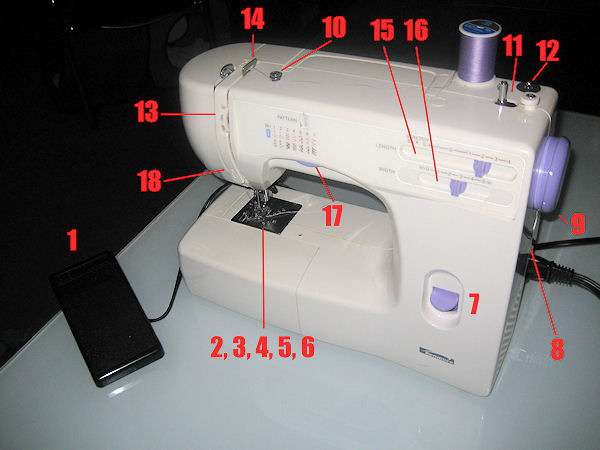
1. Pedal – It’s just like the accelerator pedal in the car. Pressing harder makes the machine go faster, while a gentle touch allows for slower, more controlled stitches.
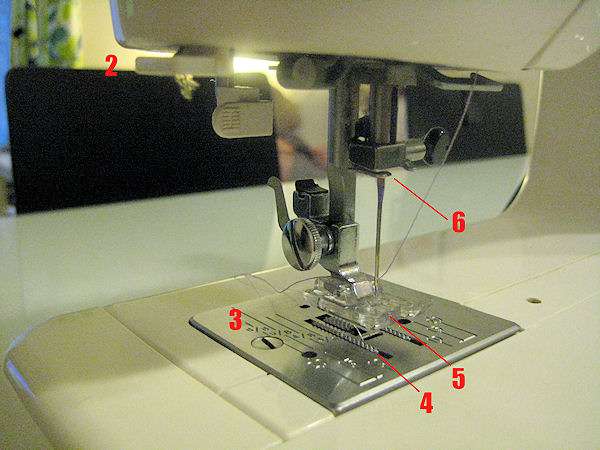
2. Thread cutter – Like scissors but easier. Just insert your thread and give a little tug to cleanly cut the thread.
3. Throat Plate – Pre-marked with 1/8 of an inch measurements, this covers the bobbin and serves as a seam gauge when sewing. In the middle of the throat plate are little ridges called…
4. Feed Dogs – These help regulate the speed at which fabric passes through the machine. They pull the fabric for you, so very little effort is required on your part! Make sure you let the machine do the work, pulling the fabric over the throat plate, otherwise you’ll have a bunchy mess of a project!
5. Presser Foot – Clamps the fabric down onto the feed dogs to prevent it from slipping while you work. These are interchangeable and available in plastic or metal. Personally, a plastic general purpose one works just fine for everything but buttonholing (I don’t mind the metal ones, though).
6. Needle Clamp – The thing that holds your needle in place. To insert a needle, loosen the knob, insert a needle, and tighten the knob until the needle is held in place by the machine.
7. Reverse Switch– This may be a button on your machine. Press this little lever when you want to sew in reverse. This is my most rarely used function; I find it easier to stop the machine with the needle still in the fabric and turn the fabric around (though this is not always possible).
8. Power Switch – The thing you use to turn on the sewing machine, usually placed next to the power cord (usually attached to the pedal). If you can’t operate this, please return your machine for a refund and take up a safer craft, like making sheep out of paper plates and cotton balls.

9. Flywheel – Raises and lowers your needle manually. This is used most often at the beginning or end of a project when you need to remove the needle from the fabric.
10. Bobbin Tension Disc – A little metal disc that keeps your thread consistently taut while working. The thread goes around the front when sewing and around the back when winding the bobbin with the…
11. Bobbin Winder – Place your empty bobbin on the winder, then slide it to the right to lock it into place. Wrap the thread around the tension disc and manually wrap it around the bobbin a few times. Pull out the flywheel to set your machine to bobbin winding mode (to prevent the needle from needlessly moving), gently press the pedal and your machine will do the winding for you.
12. Spool Pin – The thing your spool of thread rests on while you sew. If you only have a little stump (like the one to the right on my machine), pull on it to make it extend to the proper height.
13. Tension Regulator – Controls the tension of the bobbin thread and the top thread. If your machine is causing your fabric to pucker with tight stitching–or creating loose stitches—your tension needs to be adjusted. The lower the number, the lower the tension.
14. Take Up Lever – Another nifty thing that keeps the thread consistently taut when sewing. This is essentially the machine’s wrist and raises the thread up and down to create the stitches. Make sure the lever is visible when you place the fabric on the throat plate so that your needle doesn’t snag the fabric.
15. Stitch Length Selector – Allows you to choose the length of your stitches, usually sorted from longest to shortest. There is also a selection for buttonholing and for stretchy/knit fabrics (so that your stitches don’t tear when the fabric stretches).
16. Stitch Width Selector – Moves the needle so that you can choose where your needle hits the fabric. The wider the stitch, the further from the edge of the fabric it will be.

17. Stitch Selector – Lets you choose the stitch you want to use for your fabric. Most newer machines let you choose electronically, but my machine has a knob.
18. Thread Guides – Show you where to put the thread on your machine. My machine has raised, permanent step by step directions built right into its top, and yours probably does, too.
BONUS!! 19. Buttonhole Foot – A nifty little contraption automatically chooses the size of your buttonholes based on the size of your button. (We’ll discuss how to use this later, so don’t let its intimidating appearance scare you.)

Now that everything has a name and a use, we’re ready to dive into the exciting world of machine sewing (have I mentioned that my life is fairly uneventful?). Check back later to learn how to use your new best friend. Until then, any questions?
Michele Newell is a housewife turned blogger turned Home Ec 101 contributor. You can read her near daily ramblings at Dreams Unreal.

can you do more food tips
I’m sorry if you’re not enjoying the sewing series! What sort of food tips did you have in mind? Recipes? Techniques? Menu planning? Thanks in advance! 🙂
I know the names of some of the parts, but this machine is very different from grandma’s old one. Looks like this one makes sewing a lot easier. Great learning about this
Enjoyed the pictorial. You inspire me to take my machine out of the box and try.
Never took Home Ec so this all “Greek” to me, but I want to learn. Keep up the good work.