 Heather says:
At long last, the first in the series of simple bread tutorials. We are beginning with a plain white bread recipe. This version is extremely simple. It is free of most allergens (wheat being the obvious exception) so it is useful for those avoiding eggs and dairy. Nutritionally, well, let’s just say that you won’t be making great strides over store-bought, but at least there is no high fructose corn syrup. Warm up the oven, roll up your sleeves, and let’s get started.

Simple White Bread
Ingredients
| 2 cups warm water ~110°F |
| 1 1/2 TBSP Active Dry Yeast |
| 1/4 cup sugar |
| 1 1/2 tsp salt |
| 1/4 cup vegetable oil + extra for bread pan & bowl (vegetable or olive |
| 6 cups bread flour (may be slightly less in dry climates) |
Directions after the jump.
 Dissolve the 1/4 cup sugar in 2 cups warm water in a large mixing bowl. Don’t forget hot water will kill the yeast.
 Add the yeast to the sugar water and wait a few moments until it begins to look creamy.
Stir in the oil, salt, and four – five cups of flour. The dough will be quite heavy and difficult to stir by hand.
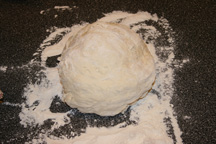 Spread the remaining flour on your work area and place the dough on the well floured surface. Go ahead and wash and oil your bowl now. Flour your hands well.
 To knead the dough place the heel of your dominant hand into the center of the dough and push away from your body and toward your work surface. Grab the edge of the dough fold it back on itself and give it a quarter turn. Don’t be gentle, this is a great way to work out some aggression. Feel free to slam the dough down on the counter, squish, fold, turn, slam. Repeat. I knead my bread between five and ten minutes, this mostly depends on how energetic or annoyed I am at the time of kneading. When kneading by hand under kneading is far more common than over kneading. To check, press your clean (unfloured) palm on the dough for about ten seconds. It shouldn’t stick (wheat breads are tackier than white).
 Roll your dough into a ball and place into your oiled mixing bowl. Turn the ball several times to coat. Cover with a damp cloth and place in a warm, non-drafty place to rise. Allow to rise for about 1 hour or until doubled in size.
 My favorite part is punching the dough down. It’s fun, enjoy this step.
 Divide the dough in half and press into two rectangles about 12″ x 6″. Do not break out the ruler, it doesn’t have to be perfect.
 Shape the dough by rolling it into a log.
 Tuck the ends under and place in an oiled 9 x 5 bread pan.
 Allow to rise until slightly above the rim of the pan. (I accidentally let this loaf go a little too long). While the dough is rising, preheat the oven to 350F.
Bake for approximately 30 minutes. To check your bread firmly tap the top when done it will have a hollow sound. Place on a wire rack to cool for 5 minutes and then remove from the pan and allow to cool completely on the rack.
While warm bread fresh from the oven is fantastic, it will not slice well until it has cooled completely.
Enjoy!

Mmmm! Looks good! Mine from yesterday turned out like a brick, but that’s what I get for using old yeast! It was still yummy while warm, though!
whole wheat/shmole wheat
there is a place in the world – a big place – for wonderful white bread. slap some good cheese between a couple slices, butter up your grill pan and i would call that friggin’ heaven…
The smell of baking bread is HEAVENLY!!! Definitely one of the reasons I bake bread. And bread warm from the oven with some butter. . . ahhhhh.
I do two things to my shaped loaves before I allow them to rise the final time: I poke them with my cake tester to pop any deep air bubbles, and I oil them to hold in the moisture as they rise/bake. That’s how my grandma taught me, but I’m sure there’s lots of variations!
I seem to recall an episode of Good Eats where he let bread dough (or some kind of yeast based creation) do the rising in the fridge overnight. The cooler environment slowed the yeast action down and was supposed to give the yeast time to develop more flavour in the dough. I might be mixing up two (or more) episodes though.
I spotted this Instructable for using a rice cooker to do the baking. Pretty clever I must say.
http://www.instructables.com/id/Rice-Cooker-Bread/
Hi. I just typed in bread tutorial and this is the 1st one to pop up. I have been trying to make a decent loaf for years. They ALWAYS come out heavy and dense. I think I made some Pan de Sal (filipiino) that was justabout okay one time. So away I go to SBWB.